
Have you installed engineered hardwood floors in your home, and after years of use they have started to show signs of wear and tear? If you are considering giving your worn-out engineered hardwood flooring a new lease on life, you are in the right place. Engineered hardwood flooring has gained enormous popularity in recent years due to its blend of natural beauty and enhanced durability. But when it comes to refinishing, some people are unsure if it’s a viable option.
Well, the good news is that you can indeed refinish engineered hardwood floors!!!
And guess what, if you do it rightly, your classic, high-end floorboard will easily last for the next 3 or 4 decades!!!
Gone are the days when solid hardwood floors were the only ones eligible for refinishing. Thanks to the advancements in technology and manufacturing, engineered hardwood floors can now undergo the floor rejuvenation process as well.
The key factor in determining whether can you refinish engineered hardwood flooring lies in the thickness of its wear layer. Thicker wear layers allow for more aggressive sanding and refinishing techniques, thereby extending the floor’s lifespan.
But isn’t it!!!
There is much more to know in terms of refinishing engineered hardwood floors to get the best and most desired result. After all, a floorboard is something where you make a lump sum amount of investment, and surely you want to enjoy its beauty and durability for years to come.
So, without further ado, let’s explore the world of refinishing and discover the transformative possibilities awaiting your floors!!
[ez-toc]
Engineered Hardwood Floors – An Basic Understanding
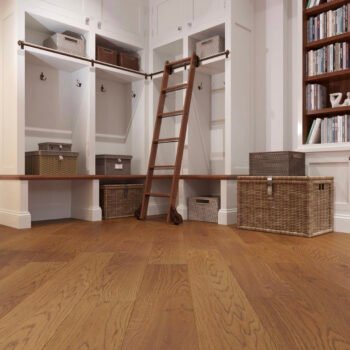
Engineered hardwood flooring aka engineered timber flooring is a new entrant in the market. It combines the elegance and luxury of real hardwood with a set of other most sought-after features like floating floor installation, water resistance, scratch resistance, and much more.
But before you consider this type of flooring for your home/office or plan to refinish your existing floors, it’s important to know what engineered floor boarding is.
Because there are a lot of misconceptions about it!!!!!!
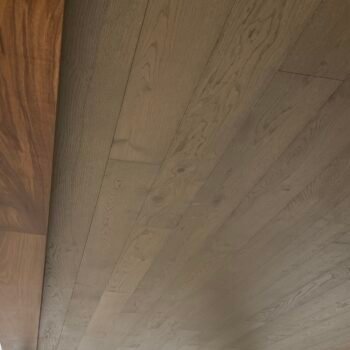
Engineered hardwood floor boarding refers to a floor that is set up of multiple layers. It consists of a slice of real hardwood sandwiched between 100% natural wood on top, a highly stable middle core, and wood on the bottom. There are approximately 5-7 layers of plywood in the core pressed in a crisscrossed pattern together.
The layered construction provides enhanced resistance to moisture and changes in temperature. This makes the engineered floorboard a versatile option for certain areas of your home.
One of the key advantages of engineered hardwood floors is their ability to mimic the natural beauty of solid hardwood while offering increased stability. The layers of engineered hardwood are arranged in a cross-grain pattern, which helps to contract the natural tendency of wood to expand and contract due to environmental factors. As a result, engineered wood floor cover is less susceptible to warping or cupping, making it a reliable choice for areas with fluctuating humidity levels.
Installation of engineered flooring is pretty straightforward. They can be glued, floated, or stapled over various subfloor types, including concrete, plywood, or existing flooring. This versatility allows for greater flexibility in choosing the right installation method based on the specific requirements of your project.
Just like installation, the steps to refinish engineered hardwood are quite simple. Moreover, it’s a brilliant solution to breathe new life into your flooring and restore its original beauty. All you have to do is assess the condition of your floor, especially, whether the thickness of the wear layer to can withstand sanding. And half of your work is done!!!
When Do You Need To Refinish Engineered Hardwood Floors?
There isn’t a specifically mentioned time to refinish engineered hardwood flooring. As long as you don’t see the “Red Flags,” you don’t need to work on it. However, as soon as you start noticing them, consider you may need to resurface the floorboard shortly.
But what are these “Red Flags?” In our guide, we refer to them as the situations when you may need to rejuvenate your floor’s appearance, repair damage or change stain and finish. As a hardwood flooring experts, being able to recognize such situations helps us to take the right decisions at the right time.
The points below tell when you need to start the resurfacing process:
1. Worn Or Scratched Surface
Engineered wood floor covers accumulate scratches and signs of wear over time, especially in high-traffic areas. Heavy furniture, pet claws, and moving objects may leave visible marks on the surface. In such cases, you notice widespread scratching or dullness that cannot be easily resolved with cleaning or minor touch-ups.
That’s the time when you have to book a refinishing session. It sands down the top layer, removing the scratches and imperfections and finally applying a new finish. This will help you restore the scratched floor’s original smoothness and shine and increase it’s value in the market.
2. Stains And Discoloration
Spills, accidents, or water damage can cause stains and discolorations on engineered hardwood floors. If you have kids at home, stains on your floor are inevitable. They can come from food, crayons, paints, sun exposure, and also reaction with tannic acid after coming in contact with moisture.
If you have stubborn stains that won’t come off with regular cleaning methods, or if your floor color has become uneven because of excessive UV radiation, refinishing is a solution. Sanding and resurfacing will remove the spots and allow you to apply a fresh coat of stain and finish. When you look for a uniform and appealing appearance for your engineered hardwood floor, refinishing and re-staining is the best option.
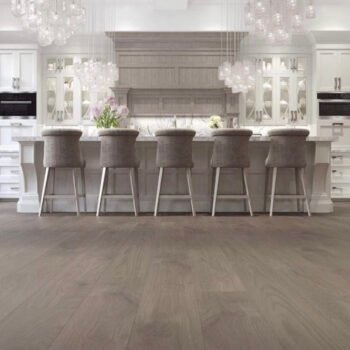
3. Faded Or Sun Damaged Finish
Sunlight slowly changes, fades, and discolors the natural tint of the engineered hardwood if exposed for a longer period. The UV rays from the sun gradually break down the protective coating. This causes the colors to fade and lose their original vibrancy.
If you notice an uneven fading or a dull appearance on your floors, it’s only refinishing that can help you revive the colors. By sanding and applying a new finish with UV protection, restore the floor’s original shine and protect them from further sun damage. Generally, the wood floors at the deck, porch, and front courtyard grow through these issues.
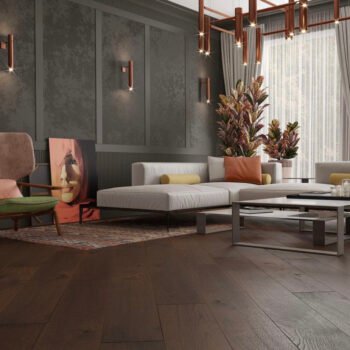
4. Change In Style Or Preference
Refinishing provides an excellent opportunity to update the look of your space or adapt to changing design preferences. Are you undergoing a home renovation or simply want to change the color, finish, or sheen of your engineered hardwood floors? Refinishing will help you to achieve the desired aesthetic.
You can choose a different stain color to match the new décor or switch from a glossy to a matte finish for a modern touch. You may also experiment with unique techniques like distressing or whitewashing to create a customized look. It’s of course a cost-effective option to change your floor’s style rather than replacing it.
5. Deep Cleaning And Maintenance
Over time, engineered hardwood floors can accumulate dirt, grime, and layers of old wax or polish, which regular cleaning may not effectively remove. Despite regular cleaning, stubborn dirt, dust, and grime can accumulate in the crevices and pores of the hardwood surface. Refinishing can serve as deep cleaning and maintenance for your floors in such cases.
By sanding off the built-up layers and applying a fresh finish, you can ensure that your floors are thoroughly cleaned, restored to their original beauty, and properly protected against future damage. If done judiciously, and with care, floor refinishing leaves a more hygienic surface apart from addressing surface imperfections.
How Do You Know Whether You Can Refinish Engineered Hardwood?
Are you not getting a proper idea on determining exactly when should you conduct engineered hardwood floor refinishing? Relax, you are not alone. This happens to us as well!!It’s a crucial step before embarking on any refinishing project.
Specially designed floors offer several flexibilities for refinishing compared to solid hardwood. Nonetheless, here are certain factors that we consider to understand whether we can perform resurfacing on the floors at the right time. You can follow them too!!!
Below we have outlined them in detail:
1. Thickness Of The Wear Layer
Engineered hardwood floors consist of a thin layer of hardwood veneer on top of a plywood or composite base. The thickness of the wear layer – the topmost hardwood veneer – plays a crucial role in determining if the floor is eligible for refinishing.
Thicker wear layers provide more flexibility for refinishing as they allow for sanding without compromising the floor’s integrity. Typically, wear layers of 2 mm or more offer sufficient thickness for resurfacing. However, thinner wear layers may not be ideal for extensive sanding and reconditioning as it may risk exposing the underlying layers.
2. Condition Of The Floors
Assessing the overall condition of your engineered hardwood floors is a MUST before re-polishing maneuvered timber floors. Its main objective is to address surface imperfections, scratches, stains, or discoloration. If there are minor issues like scratches, blemishes, or dents, you can sand them down and resurface them.
Over time, foot traffic, furniture movement, and other factors can lead to a rough or uneven texture on the surface of your engineered hardwood floor. If you feel bumps, ridges, or unevenness when walking across the floor surface, refurbishing can help restore a smooth texture.
3. Number Of Previous Finishes
Engineered hardwood floors have a limited number of times they can be successfully fixed. Each time you refinish, a small amount of wear layer is removed. Therefore, it’s important to consider how many times the floors have been previously refinished. Excessive resurfacing can deplete the wear layer and potentially compromise the floor’s durability.
For instance, your floors have already undergone multiple refurbishing cycles, or you are unsure about their history. In those cases, instead of bearing any risk, consulting with professionals can help determine the feasibility of another round of touch up.
4. Consult the Manufacturer Or Seek Professional Advice
When you purchase an assembled hardwood floorboard from a reputed manufacturer or a dealer, it comes with detailed manufacturer guidelines and instructions. They provide specifications regarding the suitability of their products for refinishing, including information about wear thickness, the maximum number of refinishes, and suitable techniques to follow. If you adhere to these guidelines, you will be able to know the specific case when refinishing session is needed. Also, you won’t void warranties anymore.
When in doubt about whether your floor requires restoration, we suggest you seek professional advice. Flooring contractors or specialists having experience with these floors assess your floor’s condition and provide expert guidance on whether restoring is a viable option.
When Should You Not Refinish Engineered Hardwood Floors?
Not every engineered hardwood floor passes the eligibility test for refinishing. There are a plethora of factors to take into account if you want to do it right and not cause any damage to the floorboard. These are also the cases when you should avoid performing it.
We have experienced that insufficient knowledge of this leads to the premature destruction of the premium maneuvered hardwood floor covers. That’s why we always keep in mind these situations so that our clients’ luxurious floors don’t get ruined.
1. Thin Or Worn Wear Layer:
Thin or already worded wear layer of the engineered floorboard is the biggest barrier to the refinishing process. If your floor’s wear layer is less than 2 millimeters, it’s not suitable at all for refinishing.
Sealing down, such as a lean layer could compromise its integrity, potentially exposing the core layers and reducing the lifespan of the flooring. This may also make the floor unstable and easily breakable. In such cases, it’s best to consult with professionals or the manufacturer to explore alternative options.
2. Excessively Damaged Wear Layer:
If your engineered hardwood floors have extensive damage, deep scratches, or significant wear throughout the wear, refinishing may not be the best solution. Refinishing primarily involves sanding the top layer to remove surface imperfections.
If the damage is too severe, sanding may not effectively restore the floor’s appearance. It may rather deteriorate the condition, and even if you have a chance to repair it, it will go in vain. The alternative options like replacing the damaged boards or opting for a new floor may be more suitable in that case.
3. Unstable Subfloor Or Moisture Issues:
Before considering refinishing, it’s quite important to assess the stability of the subfloor and address any moisture-related issues. If the subfloor is uneven or damaged, or if there are persistent moisture problems such as leaks or high humidity levels, refinishing the engineered hardwood floors is not recommended.
Moisture, on the other hand, can lead to warping, buckling, or cupping of the boards. Also, when moisture passes through the floorboards, it may carry alkaline salts and contaminants from the surface. This is detrimental to the adhesive that binds one plank to another. Refinishing without addressing the moisture content of the subfloor could even exacerbate the problem.
4. Previously Refinished Floors:
If your engineered hardwood floors have already been refinished multiple times and the wear layer has been significantly reduced, refinishing is not a viable option. Each time a floor is resurfaced, a small portion of the wear layer is removed through the sanding process. Over-refinishing can weaken the wear layer, making it more susceptible to damage and reducing its overall durability.
Furthermore, over multiple refinishing cycles, the wear layer may become uneven due to varying levels of sanding. This can result in an inconsistent appearance, with some areas of the floor having a thinner wear layer than others. Attempting to refinish such floors could again cause, such inconsistencies leading to an uneven patchy appearance.
5. Unfamiliarity With Refinishing Process:
Engineered hardwood sanding and refinishing is a complex process that requires specialized equipment and professional expertise. If you are inexperienced or unfamiliar with the refinishing process, attempting it as a DIY-engineered hardwood refinishing project can give undesirable results.
This may include improper finish, uneven sanding, or damage to the flooring. It’s best to consult with professionals who have the necessary skills and experience to ensure a successful refinishing job. Be it your home, your office, on any other commercial space, surely you want the floorboard to be in perfect condition.
Top Things To Consider When Selecting An Engineered Hardwood Flooring That Can Be Easily Refinished
Do you know that the successful execution of refinishing process largely depends on the type or quality of the engineered hardwood floor?
When it comes to finding engineered hardwood flooring that can be easily refinished, we consider several key factors. Not every type of floorboard is ideal for refurbishing and recoating. If you have that kind of floor, then at the time of refinishing, you have to face a lot of challenges.
Hence, selecting the right floorboard beforehand is something that can help you in the long run.
These are the aspects we assess to purchase an engineered hardwood floor cover that can withstand future refinishes and touch-ups:
1. Thickness
The thickness of the engineered hardwood flooring plays a crucial role in its ability to be refinished. Look for flooring with a thicker wear layer, as this layer can be sanded down multiple times without compromising the structural integrity of the planks. Ideally, choose flooring with a wear layer thickness of at least 2 to 4 millimeters.
2. Quality of the Top Veneer
The top veneer, or the wear layer, of engineered hardwood flooring, is what you refinish. It’s important to select flooring with a high-quality top veneer made of durable hardwood species such as oak, walnut, or maple. These hardwoods are known for their strength and ability to withstand refinishing.
3. The number of Refinishing Cycles
Check the manufacturer’s specifications to determine the number of times the engineered hardwood flooring can be refinished. A higher number of refinishing cycles indicates better quality and longevity. Aim for flooring that can be refinished at least two to three times, as this will give you the flexibility to renew its appearance over the years.
4. Engineered Construction
Engineered hardwood flooring consists of multiple layers of wood stacked in a cross-grain pattern, which provides stability and minimizes the risk of warping or cupping. Ensure that the flooring you choose has high-quality construction, with layers securely bonded together. This will help maintain the structural integrity of the flooring during the refinishing process.
5. Finishing Type
Some engineered hardwood flooring comes prefinished, while others are site-finished after installation. Prefinished flooring often features a factory-applied finish that is more durable and resistant to wear. Additionally, prefinished flooring usually comes with a warranty on the finish, providing added peace of mind. If you choose site-finished flooring, ensure that it’s compatible with refinishing and select a high-quality finish.
6. Installation Method
Consider the installation method of the engineered hardwood flooring. Floating floors are easier to remove and refinish compared to glued-down or nailed-down floors. If you anticipate the need for refinishing in the future, opting for a floating floor may save you time and effort during the refinishing process.
7. Maintenance Requirements
Regular maintenance and care can prolong the lifespan of your engineered hardwood flooring and reduce the need for refinishing. Look for flooring that requires minimal maintenance and is resistant to scratches, stains, and wear. Protective coatings, such as aluminum oxide or polyurethane finishes, can provide added durability and make refinishing less frequent.
8. Manufacturer’s Warranty
A reliable manufacturer will offer a warranty that covers the refinishing process. Carefully review the warranty terms, paying attention to any conditions or limitations related to refinishing. A comprehensive warranty demonstrates the manufacturer’s confidence in the flooring’s ability to be refinished without issues.
Checklist Of The Tools You Need To Refinish Engineered Wood Flooring
Engineered hardwood floor recoating and refinishing requires the application of advanced tools and techniques to get desired outputs. It’s about a complete set of equipment each of which has separate functions, and purposes.
Here is the detailed checklist of all the equipment we use for a refinishing project to do the task with an ultra-professional finish.
1. Safety Equipment
We use a bunch of highly effective safety tools when refinishing engineered hardwood in high-traffic areas to stay protected from potential hazards:
- Safety goggles to protect your eyes from dust and debris.
- Dust mask or respirator to prevent inhalation of harmful fumes and dust particles.
- Gloves protect your hands from chemicals and rough surfaces.
2. Floor Preparation Tools
We have to prepare the floor well before refurbishing it to achieve a clean, smooth, and properly prepped surface for applying the new finish. Here are the necessary tools we use to do that perfectly:
- Broom or vacuum cleaner to clean the floor to remove dust, dirt, and debris.
- Plastic sheeting or drop clothes t protect the surrounding area from dust and drips.
- Painter’s tape to secure the plastic sheeting or drop cloths in place.
3. Sanding Tools
This sanding equipment will help you remove the existing finish, smooth out imperfections, and make the surface all set for a new finish professionally:
- Orbital sander or floor buffer to sand the planks using variable speed settings.
- Sandpaper or sanding pads to choose appropriate grits for initial sanding and fine sanding stages.
- Edge sander or sanding block to reach areas where the orbital sander cannot access, such as corners or edges.
4. Repair And Patching Tools
You need these tools to address any damage, gaps, or imperfections in the engineered wood board before moving forward to renew the floor planks:
- Wood filler or putty to fill in gaps, cracks, and small holes in the wood.
- Putty knife or scraper to apply and remove the excess wood filler.
- Hammer and nail net to secure loose boards or fix any squeaky spots.
- Chisel to remove damaged pieces or trim excess wood filler.
5. Cleaning And Finishing Tools
With these advanced and inclusive cleaning tools, you can not only remove the dust and other dirt from the floor but also prepare the surface before starting the restoration.
- Hardwood floor to clean the dust, and scraps of wood and keep the newly repaired floor clean.
- Tack cloth or microfiber cloth to wipe the floor clean before applying the finish.
- Applicator pads or brushes to apply the finish evenly and smoothly.
- Paint tray or bucket to pour the finish for easy dipping or application.
6. Protective Finishes
The protective finishing tools enhance the appearance of the engineered hardwood floor while providing a protective layer against scratches, moisture, and wear:
- Stain or dye to enhance or change the color of the wood.
- Polyurethane or varnish to provide a protective layer and sheen to the wood.
- Brushes or rollers to apply the stain or finish evenly.
- Clean containers for mixing or diluting the finish.
7. Miscellaneous Tools:
These are a set of other necessary tools we use for various purposes to make our work easier and ensure a better result:
- Tape to measure the dimensions of the room or boards.
- Carpenter’s pencil to mark areas for sanding, repairs, or cuts
- Putty scraper or razor blade to remove excess finish or stain.
- Dust mop or vacuum cleaner to clean up dust and debris during and after sanding.
Engineered Hardwood Refinishing Step By Step Process
If your maneuvered hardwood floorboard has given you happier days, and you think it needs a complete refinish, no need to worry. With a lot of elbow grease and a little know-how, it’s a job that you can do at home. DIY may not be for you but knowing this process will help you bring your floor back to life.
This section will walk you through every step of the process – from prepping the floor to adding the final coat of the finishing product.
In this section, we will help you walk through every step of the process – from prepping the floor to adding the final coat of the finishing product.
Stay tuned to know how to refinish engineered hardwood floors:
Step 1: Prepare The Room For Sanding
Almost 90% of the success of your engineered hardwood floor refinishing project depends on the preparation of the floorboard. So, take time and approach it with the right care from the start. Begin by removing the shoe molding or quarter-round that runs along the perimeter of the floor. You can gently pry it away using a molding bar, making sure not to damage the molding. If you don’t have a molding bar, a putty knife can work, although it may be less effective for stubborn trim.
Don’t forget to remove any doors that might obstruct wood thresholds, and carefully inspect the entire floor for any protruding nails or objects that could damage the sanding pads. If you find any nails sticking out, gently tap https://euflooring.setoweb.com/wp-adminthem back in with a hammer and a nail set of the appropriate size. Take note of the locations of the holes and any other imperfections you come across, as you’ll need to address them later by filling them in after the initial round of sanding.
To prevent scratches, use tape to cover floor registers, ensuring they’re protected in case your equipment accidentally bumps into them. Lastly, cover all openings except for exterior windows with plastic sheets and tape. This includes electrical outlets, doors, and vents. Taking these precautions will help safeguard your space during the refinishing process.
Step 2: Start Sanding
After prepping the room, start sanding. We use 3 power tools for this job: A walk-behind sander for the main area, a random orbital sander for the edges, and a detail sander for the corners. While it’s possible to manually sand the corners, it will be more time-consuming and labor-intensive.
Step 3: Rough Sanding
Begin the initial sanding pass across the room by utilizing the walk-behind orbital sander equipped with coarse sandpaper, typically around 36-grit. It is acceptable to use sandpaper ranging from 30 to 40 grit. As you operate the sander, maintain a slow, smooth, and consistent motion, ensuring even coverage throughout. Avoid lingering in one spot for too long, spending no more than a second or two in any given area. Strive to get as close to the room’s edges as possible without forcefully hitting the baseboards.
Once you have completed sanding the main area with the walk-behind sander, it’s time to switch to the hand-held sander for the edges of the room. For the corners, you can either use a detail sander or opt to sand them by hand. When using the hand-held sander or sanding by hand apply firm pressure without causing the sander to stall or slow down. It is essential to maintain a steady and consistent movement. After completing this step, vacuum the room thoroughly to remove any excess dust before proceeding to the next sanding pass.
Step 4: Smoothing Out Rough Edges
For the next sanding pass, switch to medium-grit sandpaper, typically around 50 or 60 grit. It can be challenging to determine which areas have already been sanded as the floor’s color won’t change visibly. To overcome this, it is helpful to draw pencil lines across the room before sanding.
As you sand the floor, the pencil lines will be gradually erased, providing a clear indication of the areas you have already covered. After completing this pass with the big sander, proceed to perform edge work using the appropriate tools. Remember to vacuum the room thoroughly to remove any residual dust in preparation for the final sanding pass.
Step 5: Finish Sanding
In the final sanding stage, it is recommended to use a minimum of 80 grit sandpaper for a smooth finish. If you desire an exceptionally smooth result, you can perform two rounds of sanding: once with 80 grit and then another round with 100 grit sandpaper. Remember, to also sand the edges to ensure a consistent appearance throughout the floor.
After completing the sanding process, it’s crucial to thoroughly clean the room before proceeding to apply the finishing agent. Besides regular vacuuming, take extra care by using a damp microfiber cloth or tack cloth to meticulously remove any remaining dust. This step is essential to create a clean surface for the subsequent application of the finishing agent.
Step 3: Stain Your Floors
If you wish to alter the color or enhance the wood grain of your engineered wood floor, applying a wood stain is an option. Before applying the stain, it’s important to test it on a hidden or inconspicuous area to ensure that you’re satisfied with the color outcome.
Once you’ve confirmed the desired stain color, use a brush or cloth to apply the stain, following the natural grain of the wood. After application, wipe off any excess stain to achieve an even and consistent finish. Allow the stain to dry completely before proceeding with the next steps in the refinishing process. Patience is crucial during this drying period to ensure a successful outcome.
Step 4: Seal Your Floors
Once the stain gets dried completely, seal the wood by applying a polyurethane finish and ensure a protected layer. The best hardwood floor finishes helps you to get the right top coat for your flooring. Use a roller or a brush to get the job done perfectly following the grain of the wood. Let it dry according to the manufacturer’s instructions after which you can apply the second coat for additional durability.
Now, if you are battling with whether to use an oil-based polyurethane finish or a water-based polyurethane finish, let’s tell you that neither is better than the other.
If you want your floor to get a classic yellow or amber color over time, oil-based options are perfect for you. Whereas, if you want a clear finish that easily dries up, go for water-based products.
Step 5: Allow The Floor To Cure
The drying time and complete cure time of the finish may vary. But typically, you should leave a refurbished floor to cure for at least 48 hours before you use it. Make sure there is enough ventilation in the room at this time. This will help the drying process and disperse any existing fumes.
How Many Times Can You Refinish Engineered Hardwood Floors?
Almost all the homeowners who haven’t been through any floor refinishing process or even some experienced clients have a common question.
“How many times can you refinish engineered hardwood floor?”
Almost every type of floor needs regular and occasional maintenance like Refinishing. But it’s important to know at what intervals you should refinish the floor covers. When it comes to solid hardwood, you can do it quite several times in the floor’s lifetime. It’s because they have a better thickness and capability of withstanding the restoring procedures.
But for engineered hardwood floors, the standard number of times you can do is 1-3. After 3 sessions, you may go ahead to replace the planks.
Now, this number is not fixed in every case. The frequency depends on a myriad of factors in which the primary one is the wear layer thickness. The wear layer is the topmost layer of real wood in engineered floors. It determines how much material you can sand down during the refinishing process.
On average, floors with a wear layer of 2 mm can be renewed 2-3 times throughout their lifespan. Thicker layers, such as those around 3 mm or more, may allow for additional 1 or 2 refinishing cycles. It’s important to note that excessive sanding can compromise the integrity of this layer and affect the durability of the floor.
From our years of experience in handling numerous projects, we advise you to strictly follow the manufacturer’s guidelines and consult the professionals for your specific floorboard.
How Long Does An Engineered Hardwood Floor Finish Last?
Purchasing and installing a floorboard is a time-consuming and expensive process. In addition, a refinishing takes significant amount of bucks, which means you have to invest quite a lot of money for a maneuvered hardwood floorboard.
So, you want your premium floor6. Can You Change The Color Of Engineered Wood Floors cover to last longer, right!!!!
This longevity varies depending on a bunch of factors. This includes the finish quality, amount of foot traffic, the floor experiences, the maintenance care provided, and the environmental conditions of the space.
On average, a well-maintained engineered hardwood floor finish can last anywhere from 10-30 years before it requires refinishing. Higher-quality finishes, and floors that experience lower foot traffic may have a longer lifespan. On the contrary, the lower quality finishing materials or floor planks subjected to heavy use may require refinishing sooner.
The topmost layer, or the wear layer, is responsible for protecting the floor finish. If the wear layer becomes worn down, the floor may need to be refinished or even replaced. In this regard, you have to consider the severity of the damage.
Regular maintenance practices such as vacuuming, sweeping, and avoiding excessive moisture exposure can help prolong the life of the finish. Furthermore, protective rugs or mats in high-traffic areas and applying appropriate hardwood cleaners can also maintain and extend their life span.
How To Choose The Right Finish For Engineered Hardwood?
The finish not only enhances the natural beauty of the wood but also acts as a protective layer, safeguarding it from daily wear and tear. With a wide range of finishes available, each offering unique advantages and aesthetics, it’s important to consider various factors before making a selection.
By understanding the different types of finishes and evaluating your specific needs and preferences, you can make an informed decision. This will ensure your engineered hardwood floors look stunning and perform well for years to come.
Below are the factors to consider for choosing the ideal finish:
1. Consider Durability:
When choosing a finish for your engineered hardwood floors, consider the level of durability you need. Think about the amount of foot traffic in the area where the floors will be installed. If it’s a high-traffic area like an entryway or kitchen, you’ll want a finish that offers excellent durability to withstand wear and tear. Look for finishes labeled as “high-traffic” or “commercial-grade” for maximum durability.
2. Determine Gloss Level:
Decide on the desired gloss level for your floors. Finishes are available in different sheen levels, ranging from high-gloss to matte. High-gloss finishes provide a shiny and reflective appearance, while matte finishes offer a more subdued and natural look. Consider your aesthetic preferences and the overall style of your space when choosing the gloss level that best suits your needs.
3. Evaluate Maintenance Requirements:
Different finishes have varying maintenance requirements, so it’s important to consider the level of upkeep you’re willing to commit to. Some finishes may require more frequent cleaning, periodic reapplication, or specific maintenance products. If you prefer a low-maintenance option, opt for finishes that are known for their durability and ease of cleaning, such as water-based polyurethane.
4. Assess Environmental Impact:
If you’re conscious of the environmental impact of your flooring choices, look for finishes that are eco-friendly and low in volatile organic compounds (VOCs). Water-based polyurethane finishes are generally considered more environmentally friendly compared to oil-based alternatives. Look for finishes with certifications like GreenGuard or FloorScore, which indicate that they meet strict environmental standards.
5. Consult with Flooring Professionals:
Seek advice from flooring professionals or specialists to get expert recommendations based on your specific needs. They can provide valuable insights and suggest finishes that are suitable for your engineered hardwood floors. Consider factors such as the wood species used in your flooring, the climate in your region, and any specific considerations related to the installation site.
6. Consider Samples and Test Areas:
To get a better idea of how different finishes will look on your specific engineered hardwood, obtain samples or test areas. Apply small amounts of the finishes on inconspicuous parts of your flooring and evaluate the appearance, color, and overall compatibility. This allows you to assess how the finish will interact with the wood and determine the final look before committing to the entire floor.
7. Read Reviews and Seek Recommendations:
Research online reviews and seek recommendations from trusted sources, such as friends, family, or flooring professionals who have experience with different finishes. Pay attention to reviews that mention durability, ease of application, and overall satisfaction. Real-life experiences can provide valuable insights into the performance and longevity of various finishes.
8. Budget Considerations:
Finally, consider your budget when selecting a finish for your engineered hardwood floors. Different finishes come at varying price points, so determine your budget range beforehand. While it’s important to choose a quality finish, you can find options that offer both durability and aesthetics within your desired budget.
Secret Tips And Tricks For A Successful And Long Lasting Engineered Hardwood Floor Finish
Achieving a successful and long-lasting finish for your engineered hardwood floor is the key to preserving its beauty and durability over time. While following the manufacturer’s instructions is essential, there are also some secret tips and tricks that can take your floor finishing game to the next level.
From proper preparation to application techniques and post-finish care, paying close attention to these overlooked details can make a significant difference in the floor’s longevity.
Throughout all these years, our expert refinishers have found some astonishing tips incorporating which will help you ensure a stunning and super-durable finish. So dive right into our insider gimmicks:
1. Choose The Right Time:
Timing is crucial when planning to refinish your engineered hardwood floors. Consider the weather conditions, especially humidity levels. It’s best to undertake the refinishing project during a period of stable humidity to prevent excessive drying or moisture absorption.
2. Assess The Condition:
It’s something that nobody will tell you!! Thoroughly assess the condition of your floors before restoring them. Identify any deep scratches, gouges, or areas with significant wear. This assessment will help you determine the extent of the repairs needed and whether spot repairs or full refinishing is required.
3. Prepare The Surface Well:
Proper surface preparation is a MUST for a durable and flawless finish. We always ensure that the floors are clean, dry, and free from dust, dirt, and debris before applying any finish. Plus our team thoroughly sweeps or vacuums the floors and uses a microfiber cloth to remove any remaining dust particles. We also clear the room of rugs, furniture, and other objects.
4. Sanding Techniques:
When sanding your engineered hardwood floors, we examine the grit sequence and techniques used. Then our virtuosos start with coarse-grit sandpaper to remove the existing finish or deep scratches. Furthermore, they gradually progress to finer-grit sandpapers to achieve a smooth surface. We take utmost care not to over-sand or apply excessive pressure, as this damages the top layer of the engineered hardwood.
5. Choose The Right Finish:
Choosing the right finish for engineered hardwood floor covers is something that can lead to outstanding results. However, most homeowners make the biggest mistake here. There are so many finishes available such as oil-based, water-based, acid-based, polyurethanes, or a combination of these. Consider factors, like appearance, durability, maintenance requirements, and environmental impacts when choosing a suitable finish.
6. Apply Multiple Thin Coats:
When applying the finish, it’s better to use multiple thin coats rather than a single thick coat. Thin coats allow for better control, faster drying, and improved adhesion. Follow the manufacturer’s instructions regarding the recommended application method, drying times, and number of coats needed for optimal results.
7. Ensure There Is Proper Ventilation:
Ensure proper ventilation during the refinishing process. Open windows, and doors, and use fans to promote airflow and remove fumes from the room. Adequate ventilation helps with the drying process and improves air quality.
8. Allow Ample Drying Time:
After applying the final coat of finish, allow sufficient drying time before allowing foot traffic or replacing furniture. Follow the manufacturer’s guidelines for drying times, which may vary depending on the type of finish, humidity levels, and temperature. Premature use can compromise the finish and lead to premature wear or damage.
Are There Any Alternatives To The Engineered Hardwood Refinishing Process?
Feeling concerned with the conventional refinishing engineered hardwood steps?
If you follow the steps we elaborated on above and remember all the important things to consider, your floor cover will get a splendid restoration. Still, if you are not convinced enough to implement the procedures, we have brought some feasible alternatives for you. You won’t get the desired result with these but can improve the condition of the floor to some extent:
1. Hardwood Floor Cleaning
Hardwood floor cleaning is a long process involving deep cleaning the manufactured wooden floors to remove grime, stains, and dirt. It’s a good alternative to refinished engineered hardwood provided that you are doing it properly. Start this procedure with thorough vacuuming or sweeping to eliminate loose debris accumulated every day.
Then, apply a specialized floor cleaner diluted with water and mop it over the surface. The cleaner helps break down and remove the accumulated dirt and residue. After cleaning, dry the floors as soon as possible. Depending on the condition of the floors, you can apply a protective finish or polish to enhance their appearance and provide additional protection.
2. Recoating
Recoating engineered hardwood floors is a super viable alternative to refinishing that involves applying a new layer of finish to the floor surface. But it works well if your existing finish is intact and has minor scratches or wear. First, thoroughly clean the floors to remove any dirt or contaminants.
Next, use a specialized cleaner or light abrasion to prepare the surface for recoating. Then apply a fresh coat of finish evenly across the floor covers using a roller, brush, or applicator pad. Doing this will restore the shine and beauty of the floors while adding a protective layer. It’s a more budget-friendly and invasive substitute to traditional renovation.
3. Spot Repair
Spot repair is a widely used option for addressing localized damage scratches on specific areas of the engineered floors. First, assess the damaged area to determine the extent of the repair you need using specific tools. If the damage is too superficial, sanding the affected with fine-grit sandpaper may suffice. For deeper scratches or gouges, use wood filler or putty to fill in.
After filling and smoothing the repair spot, sand the area and apply a new coat of finish to blend it with the rest of the floor. Spot repair is a result-driven targeted solution that saves you time and effort compared to refinishing the entire floor.
4. Buffing And Polishing
Buffing and polishing can revitalize the look of the engineered wood floors both internally and externally. It’s more effective when the planks have minor scratches, dullness, or scuffs and need a cosmetic refresh.
Equip a buffing machine with a fine abrasive pad to gently abrade the floor surface. Then move the machine in a controlled manner, ensuring consistent and even coverage. Buffing helps remove light damage and imperfections by smoothening out the surface. After it’s complete, apply a new coat of polish or finish to intensify the shine and provide protection.
What Are Some Common Challenges In Refinishing Engineered Wood Floors?
The engineered hardwood refinishing process can be a rewarding project that restores the beauty and luster of your flooring. However, there are some common challenges that homeowners and floor refinishing experts may encounter. These challenges can hinder the overall work, and everything may go wrong in the process.
While working on different projects all these years, we also have come across several challenges that startled us often. We want to let you know so that you can take the necessary measures. Here are those and the detailed explanations of how they can come up:
1. Thin Veneer
Engineered wood floors consist of a thin layer of hardwood veneer bonded to a plywood or high-density fiberboard (HDF) core. The thickness of this veneer layer can vary, and it poses a challenge when refinishing the floor. Unlike solid hardwood floors, which can be sanded multiple times, engineered wood floors have a limited number of sanding cycles due to the thin veneer.
Sanding too aggressively can wear down the veneer, potentially exposing the core layer and ruining the floor. In these cases, we take extreme caution and sand lightly to avoid damaging the floors.
2. Uneven Surface
Over time, engineered timber surfaces can develop uneven surfaces due to continuous wear and tear in high-traffic areas. Minor warping by the wear of the veneer layer in certain spots gives rise to these uneven surfaces. When refinishing you have to carefully level the surface to create a smooth and uniform appearance.
This is quite a challenge as excessive sanding in specific areas to even out the floor can result in removing more material from these spots. Ultimately it compromises the veneer layer. To address this issue, we use floor leveling compounds or fillers to achieve a consistent surface before applying a new finish.
3. Limited Sanding Options
While wondering whether can you refinish engineered hardwood floors, you should also consider that challenges like this can ruin all your efforts. As mentioned earlier, the veneer layer of engineered wood floors has a limited number of sanding cycles. This means that if the existing finish requires substantial sanding to remove, it may not be feasible to redo the floor without compromising on the integrity.
In such cases, it’s more suitable if you consider other options, such as recoating the floor with a new layer of finish. This is of course better than attempting a full refinishing. Recoating involves cleaning, lightly sanding, and applying a new topcoat without removing the existing finishing layer.
4. Veneer Integrity And Damage
Maneuvered wood floors are vulnerable to damage, including dents, scratches, dents, and water stains. Before refinishing, it’s then crucial to judge the condition of the veneer layer and address any existing damage. You can easily repair shallow scratches and dents by sanding and refinishing. However, deeper damage that extends into the core layer seems to be more difficult to fix.
In some cases, damaged planks may need to be replaced to ensure a smooth and uniform surface. Additionally, water stains can be particularly challenging to remove since they can penetrate the wood fibers. Our experts use specialized wood bleach or oxalic acid solutions to lighten or remove these stains before refinishing.
5. Compatibility Of The Finishes
While recoating engineered hardwood floors, it’s essential to choose a compatible finish that adheres well to the floor and provides the desired aesthetic and durability. However, some finishing products may not bond properly with the existing finish or react negatively with the floor’s surface. This leads to a series of problems, such as peeling, bubbling, or discoloration.
We suggest you consult with the flooring professionals or a manufacturer to ensure the selected finish is compatible with the floors. The way to check this suitability is by performing a small patch test in an inconspicuous area of the board.
Engineered Hardwood Floor Maintenance After Refinishing
After investing time and effort into refinishing your hardwood floors, it’s important to implement a proper maintenance routine to preserve their renewed beauty. Regular maintenance plays a crucial role in keeping your floors looking their best and protecting them from everyday wear and tear.
Incorporate these cleaning techniques into your maintenance routine and ensure that your recently refinished engineered hardwood floor continues to shine for years to come. We suggest our clients do the same and they thank us for unbelievably amazing results.
1. Regular Cleaning:
Make it a habit to clean your engineered hardwood floors regularly to keep them looking their best. Use a soft-bristle broom or a vacuum cleaner with a brush attachment to remove loose dirt, dust, and debris. This prevents scratches and keeps your floors free from particles that can dull the finish.
2. Use the Right Cleaning Products:
When it comes to cleaning solutions, make sure to use those specifically designed for hardwood floors. These products are gentle and won’t damage the newly refinished surface. Dilute the cleaner according to the instructions and mop your floors using a microfiber mop or a well-wrung mop to prevent excessive moisture.
3. Avoid Excess Water:
While cleaning a refinished engineered hardwood, be careful not to use excessive water or soak your floors. Although engineered hardwood is more resistant to moisture than solid hardwood, it’s still important to minimize water contact. Wring out your mop thoroughly to avoid leaving excess moisture on the floors, which can lead to swelling, warping, or damage to the finish.
4. Promptly Address Spills:
If you accidentally spill any liquids on your floors, make sure to clean them up promptly to prevent any potential damage. Use a soft cloth or paper towel to blot the spill gently, avoiding excessive rubbing. If necessary, lightly dampen the cloth with a hardwood floor cleaner to remove any residue, and then dry the area thoroughly.
5. Protect from Scratches:
Prevent scratches on the floor by using protective measures. The place has pads under furniture legs to avoid scratches when moving them. Use area rugs or mats in high-traffic areas or near entryways to trap dirt and prevent it from scratching the floors. Additionally, avoid wearing shoes with sharp heels or using abrasive cleaning tools that could damage the finish.
6. Control Indoor Climate:
Maintain a consistent indoor climate to prevent excessive moisture or dryness, which can affect the stability of your engineered hardwood floors. Keep the humidity levels in your home within the manufacturer’s recommended range to avoid expansion or contraction of the wood. Use a humidifier during dry seasons and air conditioning or dehumidifier during humid seasons to regulate humidity levels.
7. Avoid Direct Sunlight:
Protect your floors from prolonged exposure to direct sunlight, as it can cause fading and discoloration over time. Use curtains, blinds, or UV-protective window films to filter the sunlight and prevent damage to your floors. Rearrange furniture periodically to ensure even exposure to sunlight, minimizing the risk of uneven fading.
8. Schedule Periodic Maintenance:
Consider scheduling periodic maintenance procedures to keep your engineered hardwood floors in excellent condition. This may include recoating or spot repairs, especially in high-traffic areas or where wear is noticeable. Consult with a professional flooring contractor to assess the condition of your floors and recommend the appropriate maintenance schedule.
Professional Refinishing Vs DIY Refinishing – Which One Is Better?
Over the years, we have sanded and refinished their floors and found a number of advantages and disadvantages between professional and DIY refinishing. People often feel stuck and get confused about whether they should go for the Do-It-Yourself method or hire a professional refinisher!!! And making this decision is a quite challenging one.
Let us tell you that the perfect answer varies from one project to another because both of these options have their advantages and considerations. Hiring professionals offers the expertise, efficiency, and high-quality results that come with years of experience. Experts like us have the necessary skills, specialized equipment, and knowledge of proper techniques to achieve a flawless finish.
On the other hand, DIY refinishing may appeal to those on a tighter budget or with a willingness to invest time and effort in learning the refinishing process. However, it’s crucial to carefully weigh the factors involved to determine which option is best suited for individual circumstances.
Based on these aspects, we have made a comparison of DIY Refinishing and Professional Refinishing of engineered hardwood to determine which one you should choose:
1. Skills And Expertise
Professional engineered hardwood floor refurbishing offers a higher level of skill and expertise. Flooring professionals have extensive knowledge and experience in handling various types of floors including hardwood. They are pretty familiar with multiple advanced floor restoration technologies, have access to professional-grade equipment, and can achieve a more polished and consistent result.
DIY-engineered hardwood floor restoration, on the contrary, requires homeowners like you to educate them about the process. Plus, you also have to acquire the necessary tools and develop the expertise to achieve satisfactory results.
2. Time And Convenience
Engineered wood floor restoration can be a time-taking and labor-intensive task. The professionals are equipped with an efficient team and specially designed tools. This allows them to complete the job quickly and faultlessly within a certain period.
DIY refinishers usually require investing in an extended period, especially, if they lack experience. Moreover, while handling all the aspects of the project from start to finish, they will likely mess it up. They won’t be able to have every tool and equipment that experts possess resulting in the inconvenience of doing it themselves.
3. Quality And Longevity
The quality of refinishing job can greatly impact the longevity and appearance of the hardwood floors. Experts have access to high-quality finishes and sealants, which are crucial for protecting the wood and ensuring durability. They also possess the expertise to properly prepare the surface, apply the finish evenly, and address any underlying issues.
DIY refinishing may result in uneven application, insufficient protection, or other mistakes that could compromise the floor’s longevity and overall quality. If you want to do it by yourself you may not be able to gather all the equipment, which won’t bring out an exemplary result.
4. Cost Considerations
Cost is a significant factor when deciding between professional refinishing and handmade refurbishing. While hiring professionals may incur higher upfront costs, it can provide better long-term value. Professionals are more likely to achieve a flawless finish, reducing the need for premature refinishing or repairs. They are well aware of what to do and how to do it so that the new finish lasts longer in the future.
On the other hand, DIY refinishing is undoubtedly more budget-friendly. You will analyze your floor’s condition, handpick the equipment, and do the tasks accordingly. You don’t have to pay for things that your floor probably doesn’t even need. But if you do mistakes, it can result in additional expenses for fixing errors or redoing the entire process.
5. Risk Of Damage
Improperly executed DIY refinishing can lead to irreparable damage to the hardwood floor. Sanding too aggressively, using incorrect products, or applying finishes incorrectly can cause unsightly blemishes or compromise the integrity of the wood. If you have adequate skills, patience, and experience, you may choose this route without a second thought.
Oppositely, professionals are trained to handle the refinishing process carefully, therefore, minimizing the risk of damage and ensuring the floor’s longevity. If you hire them, you will get superior results, and save your time and effort in the long run.
Trust European Flooring And Prevent Damaging Of Your Floors
We hope now your question, “Can You Refinish Engineered Hardwood” is now resolved. The answer is YES, you can efficiently resurface maneuvered hardwood floors and with the help of European Flooring, you can ensure a successful refinishing process without risking damage to the precious floors.
At European Flooring, we understand the unparalleled beauty and value that engineered floors bring to your home. With our expertise and commitment to excellence, we aim to provide you with the best solutions to protect and enhance your flooring investment.
When it comes to refinishing engineered timber floorboards, our team of professionals is well-versed in the intricacies of the process. We know that each of the floors has its specifications, from the thickness of the wear layer to the specific refinishing techniques required. With our guidance, you can confidently embark on the refinishing journey, knowing that your floors are in safe hands.
By trusting us, you can prevent the risk of damaging your floors during the refinishing process. Our Legno Bastone-trained experts assess the thickness of your wear layer and determine the most suitable refinishing approach. Whether your wear layer allows for a light sanding and re-coating or a more meticulous refinishing, we will guide you through the options and help you achieve the desired results.
Contact us today and let our team of passionate professionals provide you with a tailored refinishing solution that exceeds your expectations. We have our Gallery of Hardwood flooring in Miami, Palm beach and Fort Lauderdale.
Frequently Asked Questions
1. How Much Does It Cost To Refinish Engineered Hardwood Floors?
Refinishing engineered hardwood floor costs approximately around $3 to $5 per square foot. It’s always less expensive to refinish the floor than to replace them. This cost depends on factors like the size of the area, the condition of the floor, the removal of furniture, and the location of the building.
2. Can You Sand And Refinish Engineered Hardwood?
Yes, at European Flooring, we sand the engineered timber floor thoroughly during refinishing. However, the procedure to refinish your engineered hardwood flooring depends on the thickness of its top veneer. If the wear layer is thick, we do intense sanding and if not, our expert team takes action accordingly.
3. Can You Refinish Hand Scraped Engineered Hardwood Floors
Yes, European Flooring has skilled and experienced engineered floorboard refinishing experts and they renew the hand-scraped floor covers too. However, it requires special attention and care to preserve its unique texture and character. The sanding process needs to be done delicately to avoid flattening or removing the hand-scraped texture.
4. Is Refinishing Engineered Hardwood Without Sanding Possible?
Refinishing engineered hardwood without sanding is challenging as the process typically involves removing the existing finish to apply a new one. While there are alternatives like recoating or chemical stripping, these methods may not provide the same level of restoration as sanding. It’s recommended to consult with professionals to determine the best approach based on the condition of your engineered hardwood floors.
5. Refinishing Engineered Hardwood Vs. Solid Hardwood – Which One Is Better?
The choice between refinishing engineered hardwood and solid hardwood depends on several factors. Solid hardwood can be refinished multiple times and offers a wider range of customization options. Engineered hardwood, with its veneer layer, has limitations on refinishing but offers greater stability and can be a better choice for areas with fluctuating humidity levels. Consider your specific needs and preferences to determine which option is better for you.
6. Can You Change The Color Of Engineered Wood Floors
Yes, it is possible to change the color of engineered wood floors. One method is to apply a wood stain that can alter the hue and enhance the wood grain. It is essential to properly prepare the floor, test the stain on a small area, and follow the manufacturer’s instructions for the best results.